deb-src http://archive.ubuntu.com/ubuntu xenial main restricted
deb http://mirrors.aliyun.com/ubuntu/ xenial main restricted
deb-src http://mirrors.aliyun.com/ubuntu/ xenial main restricted multiverse universe
deb http://mirrors.aliyun.com/ubuntu/ xenial-updates main restricted
deb-src http://mirrors.aliyun.com/ubuntu/ xenial-updates main restricted multiverse universe
deb http://mirrors.aliyun.com/ubuntu/ xenial universe
deb http://mirrors.aliyun.com/ubuntu/ xenial-updates universe
deb http://mirrors.aliyun.com/ubuntu/ xenial multiverse
deb http://mirrors.aliyun.com/ubuntu/ xenial-updates multiverse
deb http://mirrors.aliyun.com/ubuntu/ xenial-backports main restricted universe multiverse
deb-src http://mirrors.aliyun.com/ubuntu/ xenial-backports main restricted universe multiverse
deb http://archive.canonical.com/ubuntu xenial partner
deb-src http://archive.canonical.com/ubuntu xenial partner
deb http://mirrors.aliyun.com/ubuntu/ xenial-security main restricted
deb-src http://mirrors.aliyun.com/ubuntu/ xenial-security main restricted multiverse universe
deb http://mirrors.aliyun.com/ubuntu/ xenial-security universe
deb http://mirrors.aliyun.com/ubuntu/ xenial-security multiverse
[cuckoo]
# Enable or disable startup version check. When enabled, Cuckoo will connect
# to a remote location to verify whether the running version is the latest
# one available.
version_check = yes

# Cuckoo will stop at startup if the version check reports vulnerabilities in
# one of Cuckoo's dependencies. This setting ignores the vulnerabilities
# and starts anyway
ignore_vulnerabilities = no

# The authentication token that is required to access the Cuckoo API, using
# HTTP Bearer authentication. This will protect the API instance against
# unauthorized access and CSRF attacks. It is strongly recommended to set this
# to a secure value.
api_token = HGiyE0KMWo1-0FZpvRCZnw

# The Web secret is used as a very basic, but successful way to provide basic
# authentication to the Cuckoo Web Interface. This is a shared secret amongst
# all users of this Cuckoo instance and will "protect" usage from users outside
# of this instance. Therefore, if you'd like to share this Cuckoo instance with
# the outside world, then don't use the Web secret functionality.
web_secret =

# If turned on, Cuckoo will delete the original file after its analysis
# has been completed.
delete_original = no

# If turned on, Cuckoo will delete the copy of the original file in the
# local binaries repository after the analysis has finished. (On *nix this
# will also invalidate the file called "binary" in each analysis directory,
# as this is a symlink.)
delete_bin_copy = no

# Specify the name of the machinery module to use, this module will
# define the interaction between Cuckoo and your virtualization software
# of choice.
machinery = virtualbox

# Enable creation of memory dump of the analysis machine before shutting
# down. Even if turned off, this functionality can also be enabled at
# submission. Currently available for: VirtualBox and libvirt modules (KVM).
memory_dump = no

# When the timeout of an analysis is hit, the VM is just killed by default.
# For some long-running setups it might be interesting to terminate the
# monitored processes before killing the VM so that connections are closed.
terminate_processes = no

# Enable automatically re-schedule of "broken" tasks each startup.
# Each task found in status "processing" is re-queued for analysis.
reschedule = no

# Enable processing of results within the main cuckoo process.
# This is the default behavior but can be switched off for setups that
# require high stability and process the results in a separate task.
process_results = yes

# Limit the amount of analysis jobs a Cuckoo process goes through.
# This can be used together with a watchdog to mitigate risk of memory leaks.
max_analysis_count = 0

# Limit the number of concurrently executing analysis machines.
# This may be useful on systems with limited resources.
# Set to 0 to disable any limits.
max_machines_count = 0

# Limit the amount of VMs that are allowed to start in parallel. Generally
# speaking starting the VMs is one of the more CPU intensive parts of the
# actual analysis. This option tries to avoid maxing out the CPU completely.
max_vmstartup_count = 10

# Minimum amount of free space (in MB) available before starting a new task.
# This tries to avoid failing an analysis because the reports can't be written
# due out-of-diskspace errors. Setting this value to 0 disables the check.
# (Note: this feature is currently not supported under Windows.)
freespace = 1024

# Temporary directory containing the files uploaded through Cuckoo interfaces
# (api.py and Django web interface). Defaults to the default temporary
# directory of the operating system (e.g., /tmp on Linux). Overwrite the value
# if you'd like to specify an alternative path.
tmppath =

# Path to the unix socket for running root commands.
rooter = /tmp/cuckoo-rooter

[feedback]
# Cuckoo is capable of sending "developer feedback" to the developers so that
# they can more easily improve the project. This functionality also allows the
# user to quickly request new features, report bugs, and get in touch with
# support in general, etc.
enabled = no
name =
company =
email =

[resultserver]
# The Result Server is used to receive in real time the behavioral logs
# produced by the analyzer.
# Specify the IP address of the host. The analysis machines should be able
# to contact the host through such address, so make sure it's valid.
# NOTE: if you set resultserver IP to 0.0.0.0 you have to set the option
# `resultserver_ip` for all your virtual machines in machinery configuration.
ip = 192.168.56.1

# Specify a port number to bind the result server on. Set to 0 to use a random
# port.
port = 2042

# Maximum size of uploaded files from VM (screenshots, dropped files, log).
# The value is expressed in bytes, by default 128 MB.
upload_max_size = 134217728

[processing]
# Set the maximum size of analyses generated files to process. This is used
# to avoid the processing of big files which may take a lot of processing
# time. The value is expressed in bytes, by default 128 MB.
analysis_size_limit = 134217728

# Enable or disable DNS lookups.
resolve_dns = yes

# Enable PCAP sorting, needed for the connection content view in the web interface.
sort_pcap = yes

[database]
# Specify the database connection string.
# NOTE: If you are using a custom database (different from sqlite), you have to
# use utf-8 encoding when issuing the SQL database creation statement.
# Examples, see documentation for more:
# sqlite:///foo.db
# postgresql://foo:bar@localhost:5432/mydatabase
# mysql://foo:bar@localhost/mydatabase
# If empty, defaults to a SQLite3 database at $CWD/cuckoo.db.
connection =

# Database connection timeout in seconds.
# If empty, default is set to 60 seconds.
timeout = 60

[timeouts]
# Set the default analysis timeout expressed in seconds. This value will be
# used to define after how many seconds the analysis will terminate unless
# otherwise specified at submission.
default = 120

# Set the critical timeout expressed in (relative!) seconds. It will be added
# to the default timeout above and after this timeout is hit
# Cuckoo will consider the analysis failed and it will shutdown the machine
# no matter what. When this happens the analysis results will most likely
# be lost.
critical = 60

# Maximum time to wait for virtual machine status change. For example when
# shutting down a vm. Default is 60 seconds.
vm_state = 60

[remotecontrol]
# Enable for remote control of analysis machines inside the web interface.
enabled = no

# Set host of the running guacd service.
guacd_host = localhost

# Set port of the running guacd service.
guacd_port = 4822
[sniffer] # Enable or disable the use of an external sniffer (tcpdump) [yes/no]. enabled = yes
# Specify the path to your local installation of tcpdump. Make sure this # path is correct. tcpdump = /usr/sbin/tcpdump
# We used to define the network interface to capture on in auxiliary.conf, but # this has been moved to the "interface" field of each Virtual Machinery # configuration.
# Specify a Berkeley packet filter to pass to tcpdump. # Note: packer filtering is not possible when using "nictrace" functionality # from VirtualBox (for example dumping inter-VM traffic). bpf =
[mitm] # Enable man in the middle proxying (mitmdump) [yes/no]. enabled = no
# Specify the path to your local installation of mitmdump. Make sure this # path is correct. mitmdump = /usr/local/bin/mitmdump
# Listen port base. Each virtual machine will use its own port to be # able to make a good distinction between the various running analyses. # Generally port 50000 should be fine, in this case port 50001, 50002, etc # will also be used - again, one port per analyses. port_base = 50000
# Script file to interact with the network traffic. Please refer to the # documentation of mitmproxy/mitmdump to get an understand of their internal # workings. (https://mitmproxy.org/doc/scripting/inlinescripts.html) script = stuff/mitm.py
# Path to the certificate to be used by mitmdump. This file will be # automatically generated for you if you run mitmdump once. It's just that # you have to copy it from ~/.mitmproxy/mitmproxy-ca-cert.p12 to somewhere # in the analyzer/windows/ directory. Recommended is to write the certificate # to analyzer/windows/bin/cert.p12, in that case the following option should # be set to bin/cert.p12. certificate = bin/cert.p12
# Specify the path to your local installation of mitmdump. Make sure this # path is correct. Note that this should be mitmproxy 3.0.5 or higher, # installed in a separate virtualenv (or similar). mitmdump = /usr/local/bin/mitmdump
# Listen port base. Each virtual machine will use its own port to be # able to make a good distinction between the various running analyses. # Generally port 51000 should be fine, in this case port 51001, 51002, etc # will also be used - again, one port per analyses. port_base = 51000
# Path to the certificate to be used by mitmdump. This file will be # automatically generated for you if you run mitmdump once. It's just that # you have to copy it from ~/.mitmproxy/mitmproxy-ca-cert.p12 to somewhere # in the analyzer/windows/ directory. Recommended is to write the certificate # to analyzer/windows/bin/cert.p12, in that case the following option should # be set to bin/cert.p12. certificate = bin/cert.p12
[services] # Provide extra services accessible through the network of the analysis VM # provided in separate, standalone, Virtual Machines [yes/no]. enabled = no
# Comma-separated list with each Virtual Machine containing said service(s). services = honeyd
# Time in seconds required to boot these virtual machines. E.g., some services # will only get online after a minute because initialization takes a while. timeout = 0
[reboot] # This auxiliary module should be enabled for reboot analysis support. enabled = yes
[virtualbox] # Specify which VirtualBox mode you want to run your machines on. # Can be "gui" or "headless". Please refer to VirtualBox's official # documentation to understand the differences. mode = headless
# Path to the local installation of the VBoxManage utility. path = /usr/bin/VBoxManage # If you are running Cuckoo on Mac OS X you have to change the path as follows: # path = /Applications/VirtualBox.app/Contents/MacOS/VBoxManage
# Specify a comma-separated list of available machines to be used. For each # specified ID you have to define a dedicated section containing the details # on the respective machine. (E.g. cuckoo1,cuckoo2,cuckoo3) machines = win7 #//guest虚拟机机名称
# If remote control is enabled in cuckoo.conf, specify a port range to use. # Virtualbox will bind the VRDP interface to the first available port. controlports = 5000-5050
[win7] # Specify the label name of the current machine as specified in your # VirtualBox configuration. label = win7
# Specify the operating system platform used by current machine # [windows/darwin/linux]. platform = windows
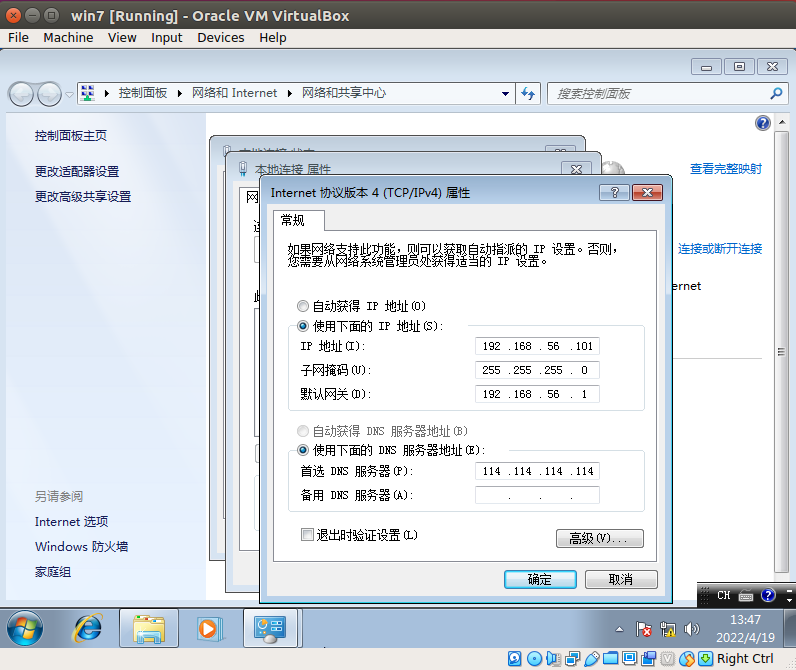
# Specify the IP address of the current virtual machine. Make sure that the # IP address is valid and that the host machine is able to reach it. If not, # the analysis will fail. ip = 192.168.56.101 #//guest IP
# (Optional) Specify the snapshot name to use. If you do not specify a snapshot # name, the VirtualBox MachineManager will use the current snapshot. # Example (Snapshot1 is the snapshot name): snapshot = Snapshot 1 #//快照名
# (Optional) Specify the name of the network interface that should be used # when dumping network traffic from this machine with tcpdump. If specified, # overrides the default interface specified in auxiliary.conf # Example (vboxnet0 is the interface name): interface = vboxnet0
# (Optional) Specify the IP of the Result Server, as your virtual machine sees it. # The Result Server will always bind to the address and port specified in cuckoo.conf, # however you could set up your virtual network to use NAT/PAT, so you can specify here # the IP address for the Result Server as your machine sees it. If you don't specify an # address here, the machine will use the default value from cuckoo.conf. # NOTE: if you set this option you have to set result server IP to 0.0.0.0 in cuckoo.conf. # Example: resultserver_ip =
# (Optional) Specify the port for the Result Server, as your virtual machine sees it. # The Result Server will always bind to the address and port specified in cuckoo.conf, # however you could set up your virtual network to use NAT/PAT, so you can specify here # the port for the Result Server as your machine sees it. If you don't specify a port # here, the machine will use the default value from cuckoo.conf. # Example: resultserver_port =
# (Optional) Set your own tags. These are comma separated and help to identify # specific VMs. You can run samples on VMs with tag you require. tags =
# Mostly unused for now. Please don't fill it out. options =
# (Optional) Specify the OS profile to be used by volatility for this # virtual machine. This will override the guest_profile variable in # memory.conf which solves the problem of having multiple types of VMs # and properly determining which profile to use. osprofile =
[honeyd] # For more information on this VM please refer to the "services" section of # the conf/auxiliary.conf configuration file. This machine is a bit special # in the way that its used as an additional VM for an analysis. # *NOTE* that if this functionality is used, the VM should be registered in # the "machines" list in the beginning of this file. label = honeyd platform = linux ip = 192.168.56.102 # The tags should at least contain "service" and the name of this service. # This way the services auxiliary module knows how to find this particular VM. tags = service, honeyd # Not all services actually have a Cuckoo Agent running in the VM, for those # services one can specify the "noagent" option so Cuckoo will just wait until # the end of the analysis instead of trying to connect to the non-existing # Cuckoo Agent. We can't really intercept any inter-VM communication from the # host / gateway so in order to dump traffic between VMs we have to use a # different network dumping approach. For this machine we use the "nictrace" # functionality from VirtualBox (which is basically their internal tcpdump) # and thus properly dumps inter-VM traffic. options = nictrace noagent